INTRODUCTION TO CHEMISTRY – FORM 1 NOTES
INTRODUCTION TO CHEMISTRY – (12 Lessons)
OBJECTIVES
By the end of this TOPIC (Introduction to Chemistry), the learner should be able to:
•Define Chemistry.
• Identify the topics studied in Primary School Science which are part of Chemistry.
• State the role of Chemistry in society and identify some applications of Chemistry in everyday life.
• Identify and state the use of common apparatus in the laboratory.
• Operate a Bunsen Burner.
• Observe safety in the laboratory.
What is Chemistry?
Chemistry is the study of the structure, properties and composition of matter and the changes that matter undergoes.
The study of Chemistry involves carrying out experiments, making observations, analysing, interpreting and making conclusions.
Review of Chemistry topics learned in the primary science course
Matter
Matter is anything that has mass and occupies space. Matter exists in three states namely solid, liquid and gas (vapour).
The three states of matter are interconvertible.

Properties of matter
Solids
Solids have definite shapes that are not easily changed. Solids also have a definite mass and volume.
Mass is a measure of the amount of matter in a substance.
Volume is the space occupied by a substance.
Different sizes of the same substance contain different amounts of matter and therefore have different masses.
When a solid is put in water, the water level rises. The rise in the water level represents the volume of the solid.
Liquids
Liquids have a definite mass and volume but take the shape of the containers in which they are placed due to their ability to flow.
Gases
Gases have a definite mass but do not have a definite volume or shape.
Mixtures
Matter is found either as pure substances or mixtures. A pure substance is one that consists of only one type of matter.
A mixture consists of two or more substances mixed together and in which the individual components forming the mixture retain their physical and chemical properties.
A mixture can be separated by physical means such as winnowing, sieving, filtering, evaporating, decanting and use of magnets.
The choice of method to separate a given mixture depends on the nature and properties of the individual components forming the mixture.
Conductors and non-conductors
Substances which allow electrical energy to flow through them are conductors. Substances which do not allow electricity to flow through them are non-conductors.
Drugs and drug abuse
A drug is any substance, natural or manufactured which when used alters the way the body functions.
Drugs used to treat diseases in human beings and other animals are known as medicines.
Medicines are administered by qualified medical officers in specific amounts called doses.
The written instructions by a qualified medical officer, giving details on the type of drugs and how the drugs should be used is called a prescription.
The use of a drug for a purpose other than what it is meant for, or the use of overdose or underdose of prescribed drugs constitutes drug abuse.
Drug abuse has harmful effects on the state of health of the user. The harmful effects include stress, depression, hallucination, addiction and dependency which may be fatal.
The commonly abused drugs are tobacco, alcohol, bhang and khat (miraa).
Harmful effects of smoking tobacco include lung cancer and heart failure. Alcohol abuse leads to liver problems (liver cirrhosis).
Misuse of bhang leads to mental disorders.
Prolonged use of khat leads to addiction, dependency and vascular disorders.
Role of chemistry in society
Chemistry offers various career opportunities in various fields such as medicine, pharmacy, food technology, education and engineering. Chemistry has helped to improve standards of living in areas such as:
1. Manufacture of drugs to fight diseases.
2. Food production to fight hunger.
3. Manufacture cheaper alternative fabrics such as nylon, polyester and tetron.
4. Manufacture of plastics for roofing, packaging and domestic use.
5. Manufacture of detergents.
6. Production of fuels for transport and domestic use. This includes alternative fuels to reduce global pollution as well as to supplement fossil fuels.
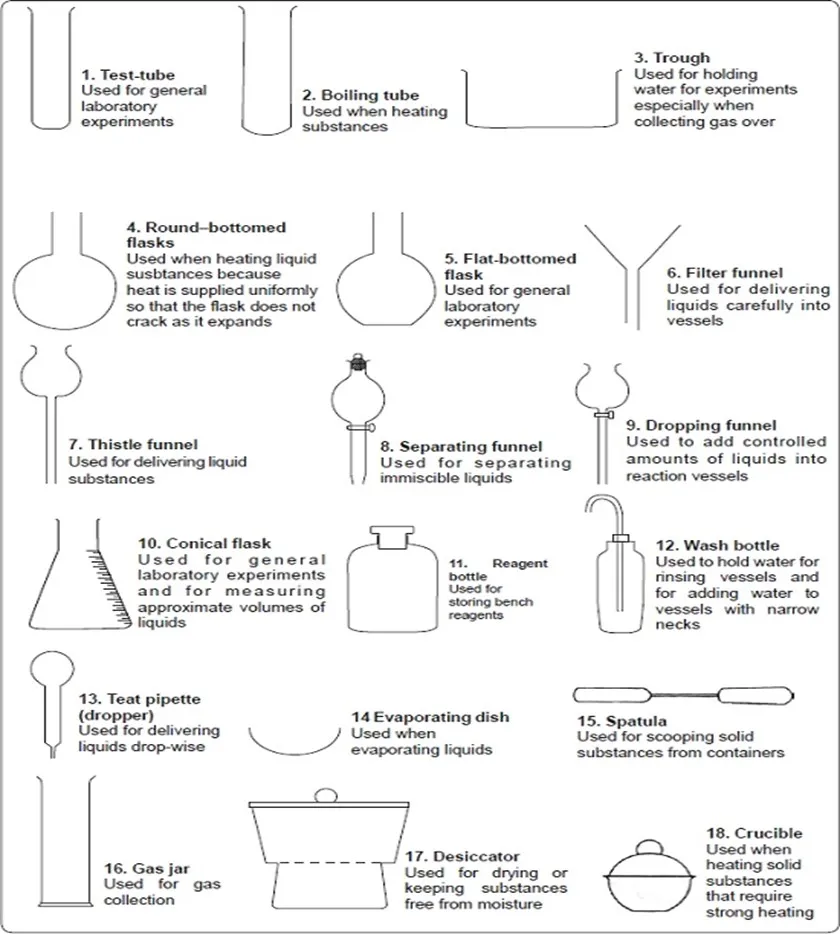
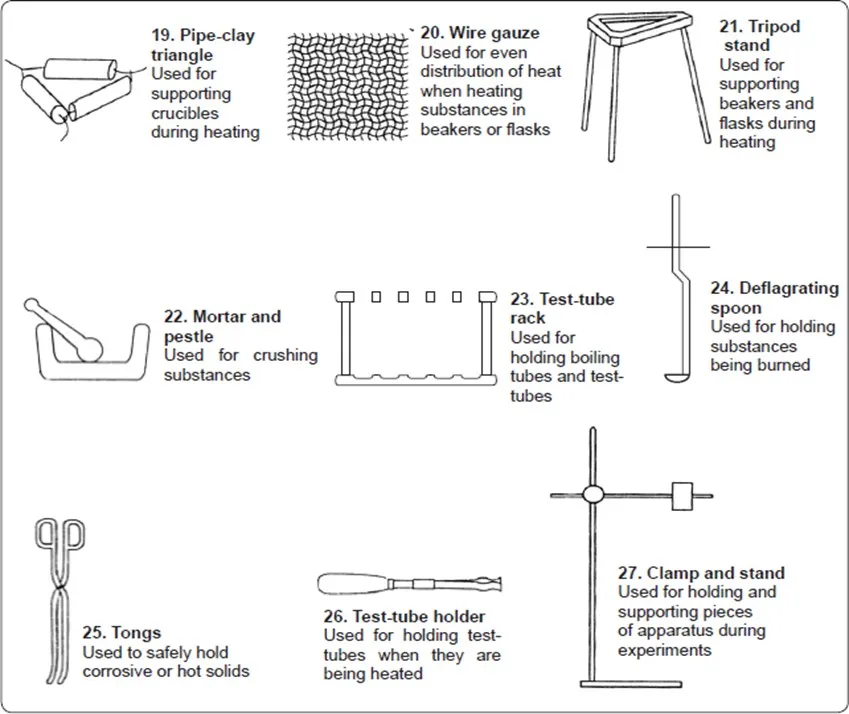
Apparatus used in Chemistry
A laboratory is a building or special room where chemicals and apparatus are kept and in which practical subjects such as Chemistry are studied.
Most laboratory apparatus which are used as containers and reaction vessels are made of transparent glass or plastic. This is to
- allow one to see through while observing the reactions taking place or
- to determine the level of the liquids held therein.
- Glass and plastic also do not react with most of the reagents used in the laboratory.
Apparatus for measuring volume
All apparatus used for measuring volumes of liquids are usually of transparent glass or plastic.
The apparatus used for measuring volumes of liquids include a graduated beaker and flask, a measuring cylinder, volumetric flask, syringe, pipette and burette.

Graduated beakers, flasks and measuring cylinders are used to measure approximate volumes of liquids.
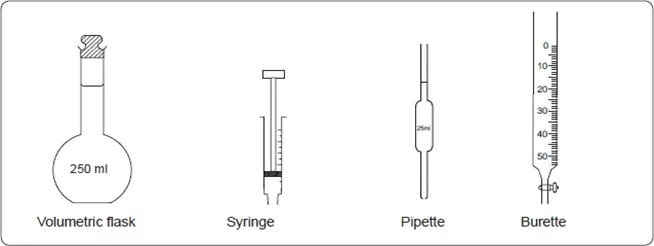
When fairly accurate volumes are required, volumetric flasks, syringes, pipettes and burettes are used.
Apparatus for measuring temperature
Temperature is measured using thermometers. There are different types of thermometers such as maximum and minimum, clinical and general-purpose thermometers shown below.

Apparatus for measuring mass
Mass is measured using weighing balances. There are different types of weighing balances such as beam balances, electronic balances and top pan balances.
Apparatus for measuring time
The apparatus for measuring time are watches and clocks. For accuracy during experiments in the laboratory, stopwatches and stop clocks are used.
Sources of Heat
The pieces of apparatus used as sources of heat include the Bunsen burner, spirit lamp, candle, gas stove (portable burner), kerosene stove and electric heater. The Bunsen burner is the most suitable source of heat in laboratories.
The Bunsen Burner
A Bunsen burner consists of three major parts. These are the chimney, the collar and the base.
The chimney is a hollow metallic cylinder with an air hole near its lower end.
The collar is a metal ring which may have an air hole whose diameter is the same size as that of the hole in the chimney. The diameter of the collar is slightly bigger than that of the chimney so that the chimney can just fit into it.
The base is made of thick metallic material into which a small hollow metal with a jet is fitted.
The Bunsen burner is normally connected to an external source of laboratory gas by rubber tubing.
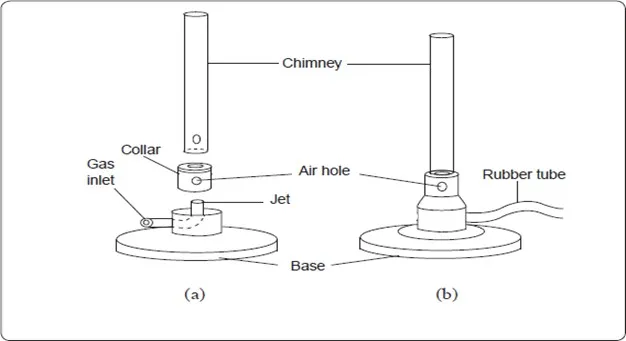
Parts of a Bunsen burner.
Functions of the different parts of a Bunsen burner
The gas inlet is connected to an external source of laboratory gas by a rubber tubing.
The jet allows the laboratory gas into the chimney.
The collar is used to regulate the amount of air entering the chimney.
The air hole in the chimney allows air to enter and mix with the laboratory gas from the jet.
This mixture of gases (laboratory gas and air), when ignited burn at the top of the chimney to produce a flame.
The types of flames produced by a Bunsen burner
A flame is a mass of burning gases.
When in use, a Bunsen burner produces two types of flames depending on the amount of air allowed into the chimney.
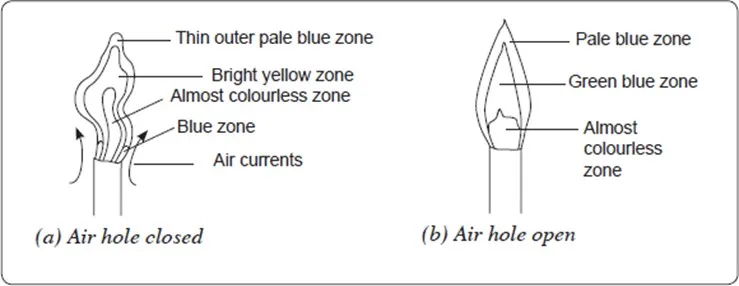
1. The Luminous Flame
When the air hole is closed, no air enters the chimney. The flame produced is bright yellow, large and wavy. It gives out much light and is described as a luminous flame. A luminous flame has four zones.
The blue zone occurs at the bottom of the flame. Air near the flame rises rapidly and mixes with the burning gas. This makes burning almost complete.
The almost colourless zone of the flame consists mainly of unburnt gases.
The luminous bright yellow zone consists mainly of unburnt tiny particles of hot glowing solid carbon which give out light.
The unburnt carbon particles form the black soot which makes apparatus dirty during heating.
The air supply in the bright yellow zone is limited and there is incomplete combustion of the gas.
In the thin outer pale blue zone, the gas burns completely because it mixes with plenty of air. However, this region is normally difficult to see.
2. The non-luminous flame
When the air hole is slowly opened, more air enters the chimney. The bright yellow colour of the luminous flame gradually changes. When the air hole is fully opened, more air enters the chimney and mixes with the laboratory gas. The mixture of gases burns more quickly and completely. The flame obtained is pale blue in colour and is described as a non-luminous flame because it does not give out much light.
The non-luminous flame has three zones.
The almost colourless zone consists of unburnt gases.
The green-blue zone contains partially burnt gases due to an insufficient supply of air.
In the outer pale blue zone, the gases burn completely because there is plenty of air.
The non-luminous flame gives out only a little light because it contains fewer hot carbon particles.
Heating effects of the luminous and non-luminous flames
Water heated by a non-luminous flame takes a shorter time to boil than the same amount of water heated by a luminous flame. This shows that the non-luminous flame is hotter than the luminous flame.
The bottom of the beaker heated using the luminous flame is covered with soot while the beaker heated using a non-luminous flame remains clean.
The non-luminous flame is normally preferred for heating substances. Luminous flames such as the candle flame and flame of lantern lamps are normally used for lighting.
Differences between luminous and non-luminous flame
BASIS OF COMPARISON | LUMINOUS FLAMES | NON-LUMINOUS FLAMES |
Colour | Luminous flame is bright yellow in colour. | The non-luminous flame is light blue in colour. |
Soot | Flames are sooty (produces soot). | Flames are not sooty (Does Not produce soot). |
Burning Stability | Flames are not steady. | Flames are steady |
Heat Intensity | Flames are not very hot (produce less heat). | Flames are very hot (Produce more heat). |
Light | Flames produce more light. | Flames produce little light. |
Burning Efficiency | Flames do not burn more efficiently. Luminous flames do not get enough oxygen to turn all the carbon that is being burnt into carbon dioxide. | Flames burn more efficiently because they are able to combine all their carbon with oxygen. |
Oxygen Access | Flames have limited access to oxygen. | Flames have unlimited access to oxygen. |
Visibility | Flames are wavy and brightly visible | Flames are hardly visible and less wavy. |
Experimental Preference | Flames are not used in experiments because it is wavy and sooty in nature. | Flames are most preferably used in experiments because they are hot, not sooty, and less wavy and hence easy to control. |
Bunsen Burner | In a Bunsen burner, the luminous flame is formed when the air-hole is closed. | In a Bunsen burner, non-luminous flames are formed when the air-hole is open. |
Examples | Examples of luminous flames include burning wood, candles, Olympic cauldron etc. | Examples of non-luminous flames include flames of a Bunsen burner when the air-hole is closed, acetylene torches etc. |
Which is the hottest part of a non-luminous flame?
Consider the following diagrams of non-luminous flames.
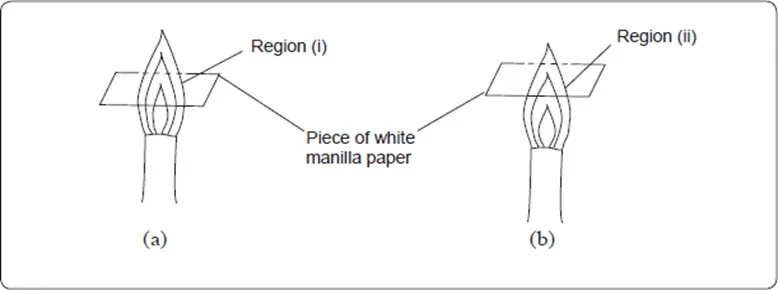
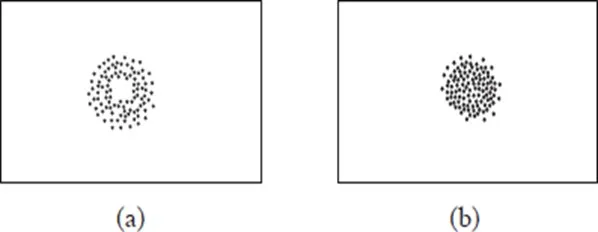
When a piece of paper is quickly slipped in and out of the region (i) of the non-luminous flame, the paper is partly burnt in the regions that are in contact with the pale blue zone. The middle part of the paper remains unburnt (no charring). When a piece of paper is slipped in and out of the region (ii) of the non-luminous flame, it burns uniformly. The results of the experiments are shown in (a) and (b) below:
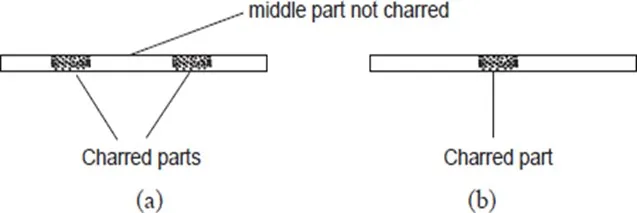
When wooden splints are used instead of paper, similar results are obtained as shown below.
These experiments show that the outermost zone in a non-luminous flame is hotter than the inner zones.
An object being heated should therefore never be placed very close to the base of the flame where we have the cooler regions of the flame. Instead, the object should be placed in the outermost region of the flame. This is the hottest region of the flame.
Safety in the laboratory
Accidents in the laboratory are minimized when safety rules are followed.
All chemicals with environmental and health impacts must be stored in well-labelled containers with appropriate safety warning symbols clearly visible.
Laboratory safety rules
1. NEVER run while in the laboratory because you may trip, fall and injure yourself or other users of the laboratory.
2. NEVER taste or eat anything in the laboratory to avoid poisoning.
3. Always consult your teacher before trying any experiment to avoid accidents.
4. Label all the chemicals you are using to avoid confusion.
5. Always use a clean spatula for scooping a substance from a container to prevent contamination.
6. Always hold test tubes or boiling tubes using a test-tube holder when heating to avoid being burned.
7. When heating a substance in a test tube or boiling tube, NEVER let the open end face you or anybody else because the liquid may spurt out and cause injury.
8. NEVER look directly into flasks and test tubes where reactions are taking place, because the chemicals may spurt into your eyes and cause injury.
9. NEVER smell gases directly, instead waft the gas towards your nose with your hand.
10. Experiments in which poisonous gases are produced must be carried out in a fume cupboard or outdoors.
11. Always keep flammable substances away from flames because they easily catch fire.
12. Report any accidents to the teacher or the laboratory technician immediately for necessary action.
13. In case of a serious accident such as a fire, calmly walk out, DONT SCRAMBLE for the exit. Doing so would hinder easy escape.
14. Always extinguish flames that are not in use to avoid accidents and minimise fuel wastage.
15. If a chemical gets on your skin or in your mouth rinse it immediately with a lot of clean water.
16. Chemicals already used must always be disposed off safely to avoid contamination.
17. Always work on a clean bench. Clean all the pieces of apparatus used and store them at the end of each experiment.
18. Other safety regulations such as the use of gloves, safety goggles, gas masks and laboratory coats should be adhered to as required.
Comments are closed.